Wednesday, September 3, 2008

Dining Out Montreal: Restaurant Europea

There are two things I used to always love about Montreal in Quebec, Canada: the exchange rate with US dollars and the abundant offerings of French food, from bistro fare to fine dining.

Now that the US economy is going down the gutter, the exchange rate is no longer much of an advantage. But fine dining is still available at much better prices than what I am used to seeing in San Francisco or New York City.

On a recent trip to Montreal, my husband and I dined at Restaurant Europea. The menu offered a la carte selections, along with a table d'hote ("host's table") five-course menu and a nine-course tasting menu. We decided on the table d'hote ($53.50 Canadian), as we figured that our tactic of each ordering a different selection for each course would allow us to partake in an ample variety.

Before we could place our orders, however, our waitress offered us a complimentary sampling of three morsels, which were quite good as a whole. Husband and I both agreed the middle selection was the most delectable--a cured piece of meat wrapped around a dried piece of fruit. Not uncommon, but definitely palate pleasing.


When our waitress came around again, we placed our orders. A few minutes later, our "La mise en bouche" arrived, a teaser of lobster cream "cappuccino" with truffle oil and a small shaving of truffle.

Le Cappuccino de crème de homard, à l’huile de truffe
(no coffee involved, but the foamy texture was reminiscent of a cappuccino)

After that, the courses came in a fluid, continuous motion. They included:

Appetizer of pan-fried foie gras over a truffled celeriac puree, foie gras "au torchon" with pineapple chutney.

Appetizer of "minute made" bison tartar, watercress mesclun, carpaccio of smoked Boileau venaison, baby vegetables.
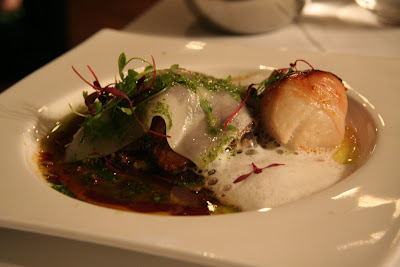
A complimentary tasting (I forgot what this was, but I believe it was a polenta of sort)

A complimentary tasting of "Light CO2 foam prepared with Caesar Salad."

Entree of slowly braised veal cheeks, fondant potatoes and parsnip puree.

Entree of roasted U10 scallop with prosciutto, Lac Brome confit duck raviole, shitake mushrooms, Jerusalem artichoke, coconut emulsion.

Rum cake dessert.

A tray of bite-sized desserts, with tuxedo strawberries!

A complimentary basket full of delicious, tiny madeleines.

Chocolate macaroon presented on a crispy feuillantine, with chocolate ganache.

My after-dinner coffee, in the fanciest setup I've ever seen. It came with four different types of sugars and a bar of chocolate!

For slightly less than US $50 a person (if you don't include the coffee I ordered), the lavish meal was quite the bargain. We had numerous complimentary tastings, and by the end of the night I could barely take a bite of my dessert. We ended up bringing most of the madeleines home, which provided a memorable snack the next day.

Except for the Caesar Salad foam, which I thought was innovative but strange, all of the dishes were executed well. I expected something to be amiss, but the quality of the food was high and the service was good (though a tad bit slow towards the end). I'm not sure if Canadian food costs are lower, or maybe they just don't care about making money, but it's a gastronomic bargain I'll gladly come back to the next time I'm in Montreal.

*-*-*-*-*-*-*-*


Restaurant Europea
Montreal, QC Canada
Rating:
4.5 smacking plums (highest is 5)

Monday, August 18, 2008

Dining Out SF: Brunch at Bar Tartine

Sometimes it takes a really inspiring meal to begin food blogging (and eating) again.

Not that I’ve stopped eating altogether of course, but sometimes you hit a slump in life where nothing tastes good, not even your favorite go-to comfort food (eggs, pasta, dark chocolate). So it’s been a lot of bland rice and veggie meals for me, which only my ex-roommate’s anorexic cat would ever consider eating (poor thing). You, my readers, have palates too good for that.

Leave it to Tartine (my favorite bakery in San Francisco and possibly America) to bring me back to gastronomic life.

When my husband proposed that we check out brunch at Bar Tartine in San Francisco’s Mission district, I was surprised and excited. Surprised because my husband has been in his frugal phase lately (which means $3 meals every day and rarely eating out) and excited because I was ready to be inspired by food again.

Bar Tartine is open for brunch on weekends from 11am-2:30pm. We were warned to arrive by 11am if we didn’t want to wait in line, so we nabbed a nearby parking spot at 10:45am and waited in the car. Sure enough, a small line started to form around 10:55am.

We were seated by a lovely hostess, and after perusing the intriguing selections (duck confit scramble anyone?), my husband opted for the open face pork belly sandwich with shoestring fries and I selected the poached egg over fresh tuna and greens (highly recommended by our waitress).

After ordering, our waitress placed down a plate of Tartine’s famous country bread.

Complimentary bread for brunch is definitely uncommon, and I wasn’t about to pass up Tartine’s country bread. In fact, if I hadn’t eaten it all I probably would have stuffed the leftovers into my purse when no one (including my husband) was looking.

The entrées came soon enough, and I was wowed by the fresh flavors of my dish. It felt like Spring was in my mouth, rejuvenating my spirit which had been as gray as San Francisco’s lousy summer.

I had been a little fearful that my tuna would be dry (or worse, canned) but it was flaky and tender, and worked well with the lemon oil drizzled on top. I ate my dish a little too quickly, and soon enough it was gone.

My husband raved over his dish, which suited his taste buds very well. Fatty pork belly lay atop a thick heirloom tomato slice and crunchy toast. I laughed as he made smacking sounds at every other bite.

The only complaint we could think of was that the fries weren't quite shoestring...they tasted more like skinny potato chips (and were inconvenient to eat, since you couldn't use a fork and picking them up one by one was tedious).

We had made plans for dessert (yes, they serve dessert for brunch!), but unfortunately were too belly-aching full for the indulgence. Someday though, I’ll be trying the meyer lemon trifle with caramel, almond cake and meyer lemon granita.

*-*-*-*-*-*-*-*

Bar Tartine

Brunch hours: Sat/Sun 11am-2:30pm

Rating: 4.5 smacking plums (highest is 5)

Friday, April 18, 2008

Sunday Dinner and Creme Brulee at the Bradys'

Growing up, I somewhat resented family dinners. While I appreciated the fact my parents were trying to have us bond with one another, the truth was we usually sat in conversation about the weather over greasy Chinese. How I longed to be hanging out with friends instead, burrowing my head in a book, or even doing my homework.

As I grew older and slowly shed my selfish desires, what we had of these dinners became fewer in between. Though I tried harder to make conversation, I realized there was little to be said between us, no matter how hard I tried. Perhaps the awkward silences were a cultural thing; I'm not sure.

When a foodie friend of mine (and former coworker) first invited my husband and I over for dinner a year ago, I was excited. Not only was her mom a food editor (dream job!) but my friend had always described these amazing-sounding meals that I was jealous to experience. What I didn't expect though, was the warmth that encircled my husband and me when we walked through the front door. Over roast lamb, we were included in the stories about cousins, cats and other drama that made me feel more at home than I ever did in the family dinners of my childhood.

During the most recent Sunday dinner, Mrs. B made a delicious homemade tagliatelle (from the Italian tagliare, meaning "to cut") with a meat ragu sauce. The pasta was made from scratch by hand, which results in a chewy doughiness I love and is impossible to recreate with dried pasta. As usual, I probably ate more than my fair share, but it's hard to pass up something as satisfying as homemade pasta.

The highlight of the night though, was my friend's creme brulee. There is a restaurant in nearby San Carlos that offers a unique creme brulee offering of orange and lavender flavor, so that was the inspiration for our dessert that evening. As most people know though, the challenging (and fun) part of making a creme brulee is torching it in the end:


The creme brulee waiting to be adorned with sugar.

A thin, even layer of sugar is the way to go for a delicate burnt sugar crust.

Holding the torch at an angle, have the flame slowly circle around
the creme brulee so that small, brown bubbles form evenly throughout.

Viola!

There have been a number of Sunday dinners since that first Sunday dinner, but my husband and I continually feel excited whenever we are invited over for another one. Delicious food aside, the only thing better than a memorable meal is the company you have the privilege to enjoy it with.

Tuesday, April 8, 2008

Vik's Chaat Corner


Michael Bauer just released his Top 100 Bay Area restaurants this past weekend, and lo and behold, I ate at 41 of these restaurants already! What I love about this list though, is that it encompasses not only Michelin star restaurants, but places where you can get a good meal for $5 too.

On a recent trip to visit my friends Steph and Kenneth, Steph suggested that we check out Vik's Chaat Corner in Berkeley. When I mentioned this in passing to my foodie coworker, she got really excited. "VIIIIKKKK'S!!!!" she nearly screamed, and started naming off the menu items to me.

I had no idea what to expect. Sure I like Indian food, but I like my naan 'n curry, and Vik's menu only had chaat (Indian snacks) which I wasn't so sure I'd like.

Going to Vik's is an experience. The "restaurant" is really a large warehouse, with a counter where you order food and some picnic-like tables to eat at. My friends and I ordered a variety of food--I had a Lamb Baida Roti and my husband (who insisted on being "Vijay" for the meal) ordered a Masala Dosa and Pani Puri.


My husband (who is Chinese, but might as well be Indian due to the heavy influence of his coworkers) taught me how to eat the puri. Apparently, there is a procedure to it. First, you take a "puff" and tap a little hole into it. Next, you put in some garbanzo beans and potatoes, then some tamarind sauce, and finally finish it with some spicy mint water. Then you just pop the whole thing into your mouth! If I didn't know any better, I'd have eaten everything separately.


It was absolutely delicious, and fun to eat. I much preferred it to my lamb roti, which was good but a bit on the oily side and my stomach wasn't feeling so keen on that day. The masala dosa was good as well, and I would highly recommend it.

I'll definitely be back. Who said good eats and cheap eats can't go together?

Tuesday, March 25, 2008

Applesauce Cupcakes...or Muffins?


I could never figure out the difference between cupcakes and muffins. Is it just the frosting that distinguishes one from the other? The time of day the sweet cake is consumed? The amount of sugar called for in the recipe? Or maybe the funny muffin top cap? Let's consult Merriam-Webster, shall we...

muf·fin

a quick bread made of batter containing egg and baked in a pan having cuplike molds

cup·cake

a small cake baked in a cuplike mold


Well, that didn't really help (it reminds me of high school math, where I learned squares are rectangles but rectangles are not squares) since most cupcakes contain eggs.

Even if the dictionary definitions look quite similar, I think the cupcake recipe books that claim they have "over x amount of cupcake recipes" are a little bogus. Their use of muffin recipes to reach their number just doesn't seem quite right.

But I digress.

My sister had purchased The Artful Cupcake book for me as part of my Christmas present last year, and I was excited to try some of the recipes. So for a colleague's birthday, I made "Applesauce Cupcakes" (or Applesauce Muffins, you decide).

As you read in my previous post, I have had slim luck with most cupcake recipes I have tried. But these cupcakes turned out fairly moist (probably due to the applesauce) and not too sweet, which I liked.

The apple crisps were more of a challenge, beginning with the process of slicing. Some apple slices came out too thick. Some were so thin it broke at the touch. Still others did not have the pretty star shape in the middle that I was going for. Good thing I bought twice as many needed apples!

When they were finally all sliced, my husband soaked the slices in sugar water, spread them on a silicone mat (silpat)-lined baking sheet and stuck them in the oven. The problem was, they didn't crisp up nor turn golden brown by the time they were to be taken out. As usual of my nature, I was on the brink of freaking out but my husband calmly stuck them back in the oven and let them bake until they had a light golden hue. Even then they still weren't crispy, but after letting it cool they eventually achieved the desired crisp texture.

The next question was: How should we store them? My husband insisted on packing them away in an airtight container but I was dubious. Still, since he is more scientifically-inclined than I am, I decided to trust him. As an experiment we left an apple crisp out to see what would happen to it.

The next morning the lovely apple slices in the container had indeed stayed crispy (and the single apple crisp became a limp sugary slice).


I then cut a slit into each of the cupcakes (about a half inch deep) and very gently inserted an apple crisp into each slit. The result was both unique and impressive (delicious, too).

Applesauce Cupcakes (from The Artful Cupcake by Marcianne Miller)

1 ¾ C cake flour

1 t baking soda

1 t cinnamon

½ t ground cloves

½ t salt

1 C brown sugar

4 oz unsalted butter, room temperature

1 egg

1 C apple sauce

1 C cherries, diced small (I left these out)

1 C raisins (I left these out)


1) 1) Preheat the oven to 350 and prepare a muffin pan with nonstick spray. (I did not use paper cups since I felt that would ruin the look)

2) 2) Sift together 1 ½ cups of the flour and the baking soda, cinnamon, cloves and salt.

3) 3) In a large bowl, cream the sugar with the butter until light.

4) 4) Add the egg to the butter mixture and mix until blended.

5) 5) Add the sifted dry ingredients and mix until blended.

6) 6) Add the applesauce and mix until blended.

7) 7) Sprinkle the remaining flour over the cherries and raisins to coat, then add to the batter.

8) 8) Pour the batter into the muffin pan, filling each cup at least halfway. Bake 10-15 minutes, or until a toothpick inserted comes out clean.

9) 9) Remove the pan and turn out the cupcakes onto a wire rack to cool.


Apple Crisps (from The Artful Cupcake by Marcianne Miller)

2 Granny Smith apples (I bought 4 in case of mistakes!)

1 C water

1 C sugar


1) 1) Preheat oven to 250 F. Cut the apples into very thin slices horizontally, making sure you have one slice for each cupcake. (Cutting across the width of the apple instead of vertically captures the design in the center left by the seeds, which will pop out as you cut.)

2) 2) In a saucepan, bring the water and sugar to a boil. Place the apple slices into the simple syrup. Let stand for one minute.

3) 3) Remove the slices from the syrup and place them onto a silicone mat set on a baking pan. Cover them with another silicone mat.

4) 4) Place the apples in the oven to dry for 30-40 minutes. They’ll come out a lovely translucent brown. (Not for me…I ended up uncovering the apple slices and leaving them in the oven for another half hour)

5) 5) Let them cool, then store in an airtight container until ready to use.

Tuesday, March 18, 2008

Cupcake Triumph (Oh so light lemon cupcakes!)


On my first day of cake-decorating class, I remember one of the things my instructor said to me:

"Never EVER use cake-box mix. And if you do, don't tell me."

I gulped, as if I had been caught red-handed. Is it really so terrible? Sometimes I just don't have the time to sift flour. And most of the time, cake-box mix has a better texture than what I can make from scratch. I like fluffy, light cupcakes and the ones I make from scratch often end up as doughy heavyweights. I will admit though, that cupcakes from the box usually lack a bit of flavor.

Looking to use the last of my Meyer lemons, and inspired by the lemon cupcakes on Cupcake Bakeshop I decided once again to make my own. I pretty much used Chockylit's recipe with a few modifications:

Lemon Cupcakes
~20 cupcakes / 350 degree oven

1-1/2 cups cake flour (yes, there IS a difference from all-purpose flour!)
3/4 cups sugar
1/4 teaspoon salt
1 teaspoon baking powder
1/4 cup grape seed oil or vegetable oil
4 egg yolks (approximately 3 ounces) (I recommend weighing it out if you can)
1/4 cup lemon juice (I prefer meyer so it's less tart)
1 teaspoon lemon extract, all natural (I left this out since I didn't have any)
grated rind from 1 lemon
1 teaspoon bitters (I left this out since I didn't have any)
5 egg whites (approximately 5 ounces) (again, weigh whenever you can!)
1/4 teaspoon cream of tarter
1/4 cup sugar
1. Sift flour, sugar, salt, and baking powder into the bowl of a standing mixer.
2. In a medium bowl, combine oil, egg yolks, lemon juice, lemon extract, lemon rind, and bitters. Stir to combine.
3. On a low setting, start to beat the dry mixture and slowly add the wet. Increase the mixer speed to medium and beat until incorporated.
4. Transfer mixture to another bowl. Wash and dry mixer bowl.
5. Whip egg whites with whip attachment on medium-high speed until foamy. With the mixer on medium speed, add cream of tarter and slowly add sugar. Beat on high speed until stiff peaks form.
6. Scoop a cupful of the stiff egg whites into the batter and stir to combine. This should lighten up the batter.
7. Transfer the batter to the egg whites and gently fold until there are no more streaks of egg white.
8. Scoop into cupcake cups about 2/3s full and bake at 350 F for 22-25 minutes or until a toothpick comes out clean.


Oh, how cozy the cupcakes look in their little snug tins! I have absolutely no desire to have kids (yet) but watching these little cupcakes bake kicks in the maternal instinct in me.

Meringue Frosting
1/2 cup sugar
3 egg whites
Sorrel simple syrup
Splash of Bitters (instead of simple syrup or bitters, I used a substitute liqueur...Grand Marnier works well)

Creme Brulee torch

1. Whisk the egg whites and sugar over a water bath in the standing mixer bowl until it reaches a temperature of 110 degrees Fahrenheit. This only takes only a few of minutes.
2. Transfer to standing mixer and whisk using whisk attachment at high speed until soft peaks form.
3. With the mixer on medium speed, drizzle sorrel syrup into the mixer. Splash in a bit of bitters. Beat on high until stiff peaks form.

I used a pastry bag to swirl the meringue onto the cupcakes. If you don't have a pastry bag, you can also take a plastic sandwich bag, cut off one of the corners, and squeeze the meringue through the hole that way (if you haven't used this method before, I would recommend practicing on a baking sheet first).

If you have a creme brulee torch, slowly torch the cupcakes in a circular motion. It might take a couple of cupcakes to get it right, but whoever complained about eating delicious mistakes?


Verdict:
I was happy. I mean, really happy! The cake part was light and airy (similar to angel food cake) and the meringue tasted like toasted marshmallow. I had some extra lemon curd on hand so I spread some on each cupcake before I decorated them with meringue. I was so excited at the results I called my husband right then and there, and exclaimed that I had finally broken out of my cupcake hole and discovered the light.

Thursday, March 13, 2008

Vino 101: The Essence of Wine

I always have the best of intentions. Really, I do. So when it comes to wine, every fiber of my being really wants to believe that the particular Cabernet Sauvignon I'm tasting has essences of oak, plum, black currant and green bell pepper.

But the only essence I smell is my nail polish remover.

I use my poor nose as an excuse. I can't smell, I protest. After all, it is often my husband who comes rushing in the midst of my cooking, "I smell something burning!" and I have no idea what he's talking about (usually it's some piece of food stuck in the stove burner).

So alas, when I found out my coworker's dad was not only the wine professor at the CCA for two decades, but one of the two wine reviewers for the much respected Connoisseurs' Guide, I knew that if one person could show me the light, it would be him.

The first lesson was on whites. A line of Riesling, Sauvignon Blanc, and Chardonnay stood before me, and I sniffed the first one (short sniffs, I learned, were more beneficial to the olfactory sensory neurons than a long inhale).

Lime, Steve (as he prefers to be called) said, do you smell it?

I sniffed some more. I sniffed with my eyes closed. I sniffed like a dog. And still I could not for the life of me smell lime. I pictured a piece of lime in my mind, hoping that would help. But alas, I shook my head.

I was a failure, and we had barely started.

Tell me what you smell in the next one, said Steve.

I sniffed. PEACH! my mind screamed. A juicy peach in its peak during summer. Yes, that was it. Perhaps I could smell after all.

Of course, I was back to smelling nail polish remover with the Chardonnay. I guess I can't win in everything.

The lesson progressed, smelling/tasting first a group of reds (Zinfandel, Cabernet Sauvignon and Syrah) and then a group of Zinfandel. Not that anyone is being competitive here, but it's frustrating when your husband "gets it" faster than you can on a consistent basis. He smelled skunk in one of the glasses, and Steve beamed. I, on the other hand, continued to smell nail polish remover. No, I do not cook my food in acetone, I swear.

I did have one more breakthrough though, when I tasted plum skin in the Pinot Noir. Still, I am convinced I need to smell more. So this weekend as Jason replanted one of our house plants, I proclaimed we needed to smell the dirt (we did). And at the grocery store the next day, we stuck our nose in blackberry and raspberry cartons.

Hey, I need to build my olfactory library somehow...

Tuesday, March 4, 2008

Celebratory Wedding Cake (aka "My first fondant cake without class instruction")

On Friday, I found out one of my coworkers didn't show up to work because he was getting hitched at City Hall. What's with all the couples getting married on Leap Day? The joke is that he only wants to celebrate his anniversary once every four years...

Anyway, I figured I'd make him a cake. It would be my first fondant cake without any class instruction and I was a little nervous, but hey, I needed to start somewhere.

I also used this as an excuse to finally try a recipe from The Cake Bible, given to me by a friend on my birthday. To be honest, I wasn't sure what to think when I first flipped through the inside. I'm a very visual person, so I normally get cookbooks with beautiful pictures (and a 4+ star rating from Amazon of course). But this particular friend of mine (the gifter) makes beautiful (and delicious) cakes, and if she swears by this book then who was I to judge a book by its lackluster print?

After reading a few, I selected the Golden Genoise cake with Berry-Grand Marnier mousseline buttercream.

Challenge #1: I had no idea what genoise cake was really supposed to look or taste like. It's like asking a sculptor to make a statue of your mother with no picture.
Challenge #2: Buttercream. The last time I made it, I failed miserably. And that was with an easier recipe from Martha Stewart. Would this prove to be a big flop as well?

This time, I was determined to give myself plenty of time to bake. I would bake the cakes on Saturday, make the buttercream on Sunday and put it all together Sunday night. Except things never turn out the way it's planned and I was occupied with random errands and events on Saturday.

Then I told myself I would bake the cakes Sunday morning before church. Yeah, right. All I really got done was measuring the ingredients, laying out all the kitchen tools, and clarifying the butter. By the time church was over, I was already stressing that this grand idea would never come together. Plus I realized I forgot to buy some essentials like a cake box and pearl dust!

Not good.

Thankfully, my husband offered to help and while I rushed off to Michael's, he helped me make the beautifully golden cake layer (thanks, honey). The smell hit me when I came home and opened the door. It smelled like madeleines, and I am already plotting on using this recipe to make a dozen of the seashell treasures next time.

As I prepped the ingredients for the buttercream and read through the recipe one last time, I read with a sinking feeling the footnote warning: "Make sure the softened butter for the buttercream is not too warm or it will curdle. It should still be cool to the touch, about 65 degrees" Oh, crap. I had left the butter out too long (about four hours) and it was definitely in its 70's and very warm at that point. So I had to take out fresh sticks of butter and wait for it to soften a bit.

Once I started working through the buttercream recipe though, I felt confident. The egg whites were peaking, the butter was creamy, and the sugar syrup was at its precise temperature. No problem. Then I got to putting in the last part of butter and it started curdling.

Oh, crap again. I was about to admit defeat when my husband the hero comes in, takes a look, whips up the cream at a higher speed and miraculously saves it (maybe it wasn't so miraculous, but it seemed like it). The buttercream was severely alcoholic with 1/3 cup of Grand Marnier, but hey, a lot of a good thing can be a good thing.

When the two layers of cake were cool, I stacked them with buttercream in between and then stuck it in the fridge for a few minutes while I prepped the fondant. I'm too lazy to make my own fondant, so I purchase them by the pound directly from my instructor, who sells them at a really great price (almost cheaper than making my own). I still had to make the fondant soft and malleable enough for my use though.

As I rolled out the fondant, I tried to make it thin. (Thin is in, as my instructor always says). Unfortunately I was leaning on the anorexic side because as I covered my cake, one side of the fondant cracked. I could have dissipated into tears, but one of the beauties of fondant is that you can always cover it with more fondant. So that I did. I decided to cut out some fondant flowers, brush them with pearl dust, and "glue" them (with sugar water) over the unsightly crack. Then I went ahead and decorated the whole cake with that pattern.

For a finishing touch, I encircled the cake with a brown silk ribbon, and topped them with Unazukin wedding cake toppers I originally was going to use for my own wedding reception in SoCal, except that these babies didn't arrive from Japan in time. Oh well, now they would be put to good use! I also printed out a picture of City Hall and stuck it in the back to make it entirely relevant to my coworker's nuptials.

Here's the picture of the cake:


Oh, and in case you're not familiar with Unazukins, they are little Japanese toys that nod or shake their heads to your question. So one of my coworkers (a man) asked loudly, "Will you marry me?"

The little groom nodded his head twice, while the little bride shook her head no.

Happy wedding to all you leap-year newlyweds!

Monday, February 18, 2008

Topsy Turvy Fondant Cake


I should officially be called "She-Who-Always-Finishes-Last." You know that student who is consistently a step behind everyone else? Yeah. That's me. Blame it on the perfectionist gene.

This time I vowed I would not be so slow. In fact, during this particular class my teacher cracked a joke on how irritated he gets with students who stay late after class. Yikes. I was sure he didn't remember me, though (at least he had forgotten my name).

So against my nature, I rushed through my cake. Yet I still managed to be the one who was still struggling with her last piece of fondant while everyone else sat around eating cookies, waiting for me. You know they don't really mean, "Take your time" when they're looking at their watch simultaneously mouthing the words. Bah.

It was fun learning how to create a "Topsy Turvy" cake and how you attach it together. The hardest thing for me is rolling the teeny pieces of fondant. No matter how much powdered sugar I sprinkle on the surface (which is supposed to be as little as possible), my fondant manages to stick to the table while everyone else's peel off gracefully. Go figure.

At least my cake turned out half decently, though it was far from being flawless. Note to self: Thou shall cut nails before working with fondant so the fondant doesn't get nail marks as you're putting the cake into the box.

I also wasn't quite as slow this time. Instead of staying 1.5 hours after class (personal record) I only stayed an extra half hour after everybody else. Still won the trophy for "last student" though. *sigh*

Thursday, February 7, 2008

The Affair with Meyer Lemons


My favorite "fruit" may just as well be the Meyer Lemon. It's certainly not a fruit you can eat straight out of the rind, but I love its versatility. I have the fortune of knowing two people with Meyer Lemon trees, and so every time I ask nicely (with a "Pretty please?") I get a good bag full of these sunny beauties.

The first thing I did with these lemons was not to make something out of them, but to photograph them. So here is the brief photo shoot:


Then I decided I was going to try making Alice Waters Meyer Lemon Cake--again. I first tried this recipe last year and it turned out so-so (well, badly in my book but "yummy" in my friends' book so you decide who you want to believe). The flavor was perfect, but the consistency wasn't right; there were lots of lumps and a cake should be lump-free.

Here's the recipe I used:

Meyer Lemon Cake

(makes one 9-inch cake)
  • 8 tbsp. unsalted butter
  • 4 large eggs, separated
  • 1¼ cups sugar
  • 2/3 cup buttermilk
  • 1/3 cup Meyer lemon juice
  • 1 tbsp. Meyer lemon zest
  • 2 cups cake flour
  • 1¼ tsp. baking powder
  • 1/4 tsp. salt
  • For the glaze:
  • 1/3 cup Meyer lemon juice
  • 1 2/3; cups confectioners' sugar
  • For the candied Meyer lemon slices:
  • 2 Meyer lemons
  • 2 cups sugar

Preheat the oven to 325° F.

Melt butter in saucepan. Cool and set aside. In a mixing bowl, using an electric mixer, beat egg yolks with 1 cup of the sugar until thick and light in color, about 2 to 3 minutes. Beat in buttermilk, Meyer lemon juice and zest. Sift together cake flour, baking powder and salt. In a separate bowl, beat egg whites with an electric mixer until they hold soft peaks. Then add the remaining ¼ cup of sugar and continue beating until stiff peaks form. Fold half the flour mixture into egg-yolk mixture, followed by half the egg white mixture—so you don't deflate the batter. Repeat with remaining flour and egg white mixtures. Take about 1 cup of the batter and stir it into melted butter. Gently fold butter mixture into the rest of the cake batter. Pour into a buttered and floured 9-inch cake pan or Bundt pan, and bake for about 50 to 60 minutes until cake is lightly brown and pulling slightly away from the edge of the pan.

While cake is baking, make glaze and candied Meyer lemon slices. For glaze, combine Meyer lemon juice and the confectioners' sugar in a saucepan. Heat, stirring occasionally, until sugar is dissolved. Set aside. For the candied slices, cut Meyer lemons widthwise, in ¼ inch slices, and discard end pieces. Remove seeds. In a saucepan, combine 2 cups of water with 2 cups of sugar. Bring to a gentle boil and simmer five minutes. Add lemon slices and simmer about five more minutes, until fruit is soft but not falling apart. With a slotted spoon, remove slices and place on waxed or parchment paper.

When the cake is baked, cool in the pan for 5 minutes, and then invert onto a cooling rack. With a long toothpick, poke the top of the cake to make about two dozen small deep holes. Slowly spoon the warm glaze over the cake, allowing to sink in before adding more. Poke extra holes if needed, eventually using all the glaze. Arrange the candied lemon slices in a random pattern on top. Cool the cake completely and serve.


Verdict:
It was certainly better this time around! I decided to sift the flour and that made a big difference. The cake still had a few lumps here and there, so I'm guessing I need to work on the folding part of the process. I thought I was being really careful, but maybe not careful enough...if any one has some tips, let me know!

All in all, I was rather pleased, and the candied lemon slices went rather well with the cake--tart and sweet. My foodie coworkers liked it too, so that should count for something, right?

Monday, January 21, 2008

Cute Love (Tagliatelle with baby zucchini, lemon and basil)

I have a penchant for cute things. In fact, a high school teacher of mine once signed my yearbook with: "I will always remember you as the girl with the cute pencils, cute pencil cases, and cute boys." (I apologize if you just gagged)

You'd think I'd have outgrown all the "cuteness" by now, but during a recent visit to Trader Joe's, I discovered the latest cute thing...


Baby zucchini! Yes, that's right. They are even smaller than my hand. I was drooling over how cute they were (with Husband rolling his eyes) so I bought them without knowing how I was going to cook with them. Honestly, I don't even know what they are really called...Baby zucchini? Miniature zucchini? Dwarf zucchini? Smurf food? If you know, please enlighten me.

The zucchinis sort of just sat in the fridge for awhile. They brought a smile to my face whenever I opened the vegetable drawer, but I just didn't know when or how to use them. Similar to buying a sexy new dress that sort of just sits in the closet (I'm primarily addressing the female audience with this example)--especially if you're actually a jean and sweats person, like me.

After nearly a week, I decided enough was enough and I would cook them or else waste the $3.99 it cost me to buy the pack of zucchinis. So I searched the net and found this Jamie Oliver recipe:

Tagliatelle with baby zucchini, lemon and basil

4 tablespoons olive oil
2 cloves garlic, finely chopped
8-10 very small, very firm zucchini, sliced on the diagonal
Juice of 1 lemon
A good handful of fresh basil, picked
450 g fresh tagliatelle
salt and freshly ground black pepper
100 g parmesan, grated

Put the olive oil and the garlic into a semi-hot, thick bottomed pan and fry for about 30 seconds without colouring, then add the zucchinis and toss gently. After about 2 minutes, add the lemon juice and the basil and cook a little longer.

Meanwhile, cook the tagliatelle in salted boiling water, then drain. Toss it with the zucchini to mix the flavours, season to taste, and add the parmesan. Serve with some torn basil and a sprinkling of extra parmesan.

Serves 4.


The result? Not bad. I don't think there was enough zucchini for the amount of pasta though, perhaps the zucchinis I purchased were even smaller than "baby" size? Who knows. I would actually have doubled the amount of baby zucchinis (I used 10) but then again, I'm a veggie lover and would have appreciated at least a slice of zucchini in each bite (with this recipe, I had maybe a teeny piece of zucchini for every two bites).

I definitely cooked the zucchini too long, or should have used a lower heat (I used medium-low). Not all recipes are meant to be followed exactly! I would also have used a little more lemon juice (I couldn't really taste it). Also, don't let the amount of basil scare you--it shrinks quickly!

-----------------------------------------------------------------------------------------

BTW, here's a cool recipe contest to enter! For a chance to win a $35 gift card to Crate and Barrel (!!!), all you have to do is post about this contest:

Jenni's Kitchen Recipe Contest Giveaway

And to double your chance of winning, all you have to do is pick a recipe, make it and blog about it. How easy is that?! (I mean c'mon, we do that anyway). I can't believe only like four people have entered. What are you waiting for?!

Saturday, January 12, 2008

Face to Face With the Ugly (aka Celery Root)

Who knew the celery was related to this horrendous-looking thing...


When Husband made an oxtail dish last week, the recipe called for "celeriac" aka celery root (what's that?!). When he came home with a bag of groceries, this alien vegetable nearly freaked me out. Who the heck thought this was okay to eat?!

It actually tasted fine though--celery nuances in a translucent form. A food's tastiness is definitely not based on looks.

What is the ugliest thing you have ever cooked with?

Wednesday, January 2, 2008

Caramelized-Apple Spice Cake with Brown-Sugar Swiss Meringue Buttercream


Oh, when will I ever learn that trying to bake something new right before company comes over is rarely a good idea?

I wanted to make this Martha Stewart cake for a Saturday holiday party, so I started making it Friday night. The cakes baked beautifully, and on Saturday morning I started on the buttercream. I never made buttercream before, but I figured it'd be easy (how different can it be from frosting or whipped cream?) I figured it'd take me, oh, half an hour.

Why didn't anyone ever tell me that making buttercream is not a job for a novice? The first batch I made resulted in a lumpy, chunky mess, not the smooth velvetiness it was supposed to be. Husband suggested fishing out the tiny pellets of butter, but after seeing just how many there were, he changed his mind.

"You're not going to cry again, are you?" he asked. I shook my head no and turned away (because I was).

I was now running half an hour behind my cooking schedule. I rushed to the nearest supermarket, bought more butter, and rushed back home. The second batch turned out wonderfully. After I spread it around my cake, I added gingersnap leaves as a finishing touch.

The lesson I learned? As you're adding butter to the warm meringue mixture (step 2 below), you want to work quickly. Once the meringue cools, STOP or you will end up with pellets like I did in my first batch. It doesn't matter if you don't get a chance to use all four sticks of butter (might be a good thing anyway). I only ended up using three and it turned out great. The best part? The guests raved.

Brown-Sugar Swiss Meringue Buttercream (Martha Stewart)

Makes about 5 cups

  • 5 large egg whites
  • 1 2/3 cups packed dark-brown sugar
  • 1/4 teaspoon salt
  • 4 sticks (2 cups) unsalted butter, room temperature
  1. Put egg whites, sugar, and salt into a heatproof bowl set over a pan of simmering water. Whisk until mixture registers 160 degrees, about 4 minutes.
  2. Beat on high speed until stiff, glossy peaks form, about 6 minutes. Reduce speed to medium-low. Add butter, 2 tablespoons at a time, beating after each addition (meringue will deflate slightly as butter is added). Beat until frosting is smooth and glossy, 3 to 5 minutes. Buttercream can be refrigerated airtight for up to 3 days; bring to room temperature, and beat before using.